9 Easy Banjo Maintenance Tips
Basic banjo setup is very easy and shouldn't be intimidating. Banjos are kind of like big Erector sets. They are made up of a lot of screws and bolts that can loosen up over time. This can cause your banjo to lose its original tone that you loved. With just a few turns of a wrench or some other simple adjustments, you can keep your banjo sounding and playing great. Learn 9 banjo maintenance and banjo setup tips here.
1. Tighten Your Banjo Head
One of the first things to check when you notice either the tone of your banjo not sounding quite as good as it use to be or if you are getting some buzzing when you play certain frets is your banjo head tension. Starting with the latter issue first, when your banjo head gets looser, the strings are naturally going to go down a bit as the bridge sags down more into the looser head. If you notice the feet of your banjo bridge indenting into your banjo head, then it is usually a good sign that you need to tighten your head.
A tighter head will give your banjo a brighter, crisper tone. Most people are looking for that type of tone. You can check the head tension by tapping on the head and listening to the pitch that comes from it. The most common pitch people aim for is a G#. If the tone is too bright for you, try loosening your head a bit until you get the desired tone you are looking for. Some players such as Bela Fleck aim for this less bright tone and set their banjo head tension somewhere around an F#.
2. Change Your Banjo Strings
Changing your banjo strings is something you just have to do and is another one of the easiest things you can do to bring back some life to the tone of your banjo. If you see any corrosion or dirt build up on your strings, this is definitely a sign that you should change them. I change mine about every two weeks. The life of your strings depends on how much you play, if you wipe them off after every time you play your banjo, and the humidity level.
3. Put the Bridge In the Right Place
A banjo bridge is a type of bridge called a floating bridge. This means that it is held on strictly by the string tension. It is not glued on in a fixed place. If you took all of your strings off, it would just fall off. Because of this, it is susceptible to moving slightly out of place from small bumps. A slightly out of place bridge will not only cause your intonation to be off as you play farther up the neck of the banjo, but it will also not allow your banjo to ring out as well as it can.
You can check to see if your bridge is in the correct place by playing the 4th string harmonic at the 12th fret and then playing the 4th string note at the 12th fret. These pitches should be the same. If the fretted note is flat, then you need to move your bridge up closer to the neck on that side of the bridge. If the fretted note is sharper than the harmonic, then you need to move the bridge back towards the tailpiece on that side of the bridge. Do the same thing on the 1st string, but slide the bridge backwards or forwards on that side. Your bridge may be a slight angle. This can change due to a number of factors.
4. Adjust the Tailpiece
A good banjo tailpiece such as the Deering tailpiece is fully adjustable. There is a screw on the back of the tailpiece that adjusts the angle of the tailpiece. A tailpiece adjusted down closer to the head will give your banjo a crisper, brighter tone. A tailpiece adjusted looser - farther away from the head will do the opposite. Adjust the tailpiece down to the tension that gives your banjo the tone you desire.
5. Adjust the Coordinator Rods
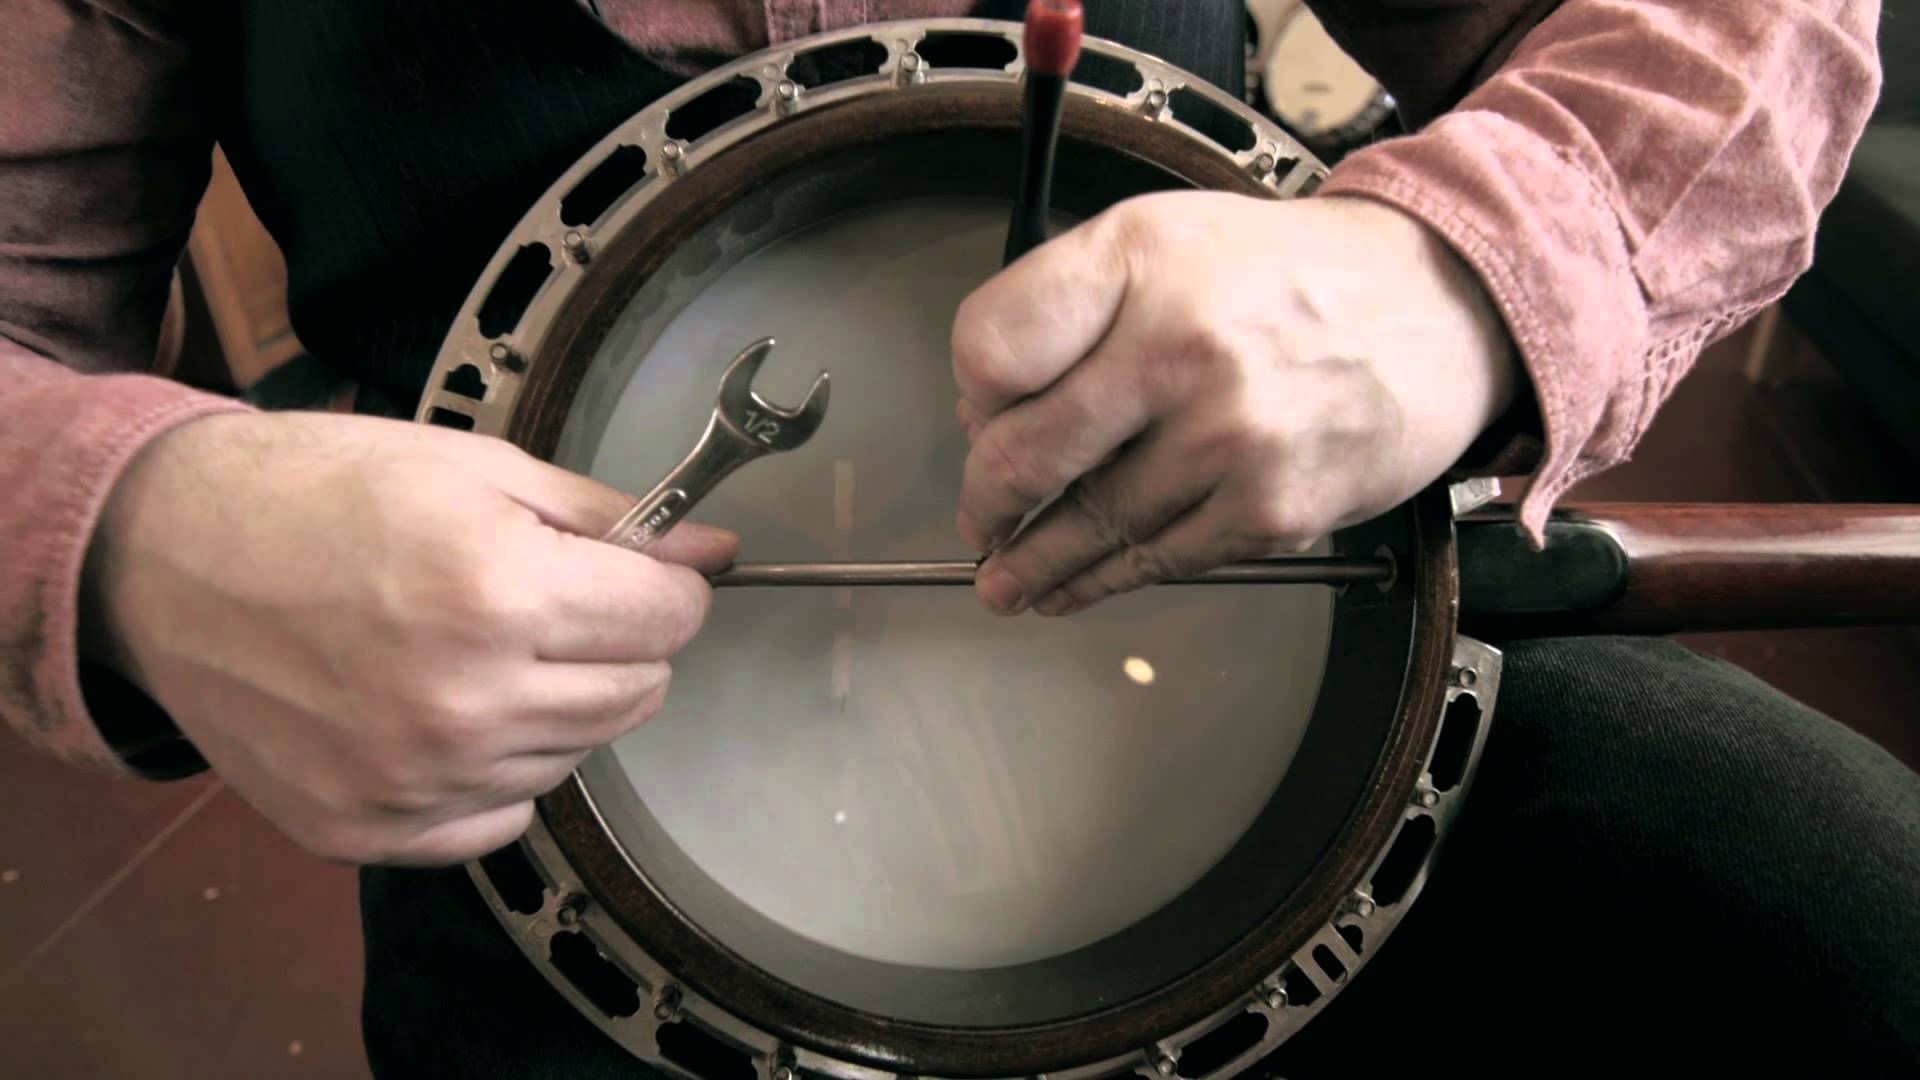
Not all banjos have coordinator rods. Some have wooden dowel sticks. The good thing about coordinator rods is it gives you much more adjustability in your banjo’s action and makes this very easy. If you want to bring the action of your banjo (the height of the strings from the frets) down, you would put a nail or allen wrench through the little hole on the coordinator rod that is closest to you and hold onto this so that the rod does not spin (or else you will either loosen the neck from the pot or strip the threads in the rod). Then loosen the nut that is on the inside of the rim (on the coordinator rod) near the tailpiece. Back that nut off so it is not in the way, and then tighten the nut that is on the outside of the rim (near the tailpiece). Turn it about a ¼ turn and then play your banjo and see if the action is where you want it. If you want it down more, then tighten the nut another ¼ turn and repeat until you get the action where you want it. Tighten up both of the nuts when you are finished.
If you wanted to raise the action, you would do the exact same thing, except this time loosen the nut on the outside of the rim and tighten the nut on the inside of the rim.
6. Adjust the Truss Rod
Not all banjos have truss rods, but having a truss rod gives your banjo another way to adjust the action. First you would try adjusting the action via the coordinator rods, but if you can’t get it all the way to where you want it via that route, you would then move on the the truss rod. The truss rod is a metal rod that runs down the banjo neck, gives the neck stability, and helps you adjust the curvature of the banjo neck which in turn affects the action of your banjo. To lower your action you would want to tighten the truss rod, so I would suggest making a ⅛ of a turn clockwise and then checking the banjo action. Repeat this until the truss rod is all of the way tight. Do not put any muscle into your tightening. You want to be careful that you do not strip the truss rod. Do the opposite to raise the action.
7. Tighten the Tuning Buttons
A very common problem with banjos is that the screws that hold the tuner buttons on loosen up thus causing your tuning pegs to slip and not hold the banjo in tune. You can fix this very easily by simply taking a screwdriver and tightening the screw that holds the tuner button on.
8. Change Your Banjo Head
Banjo heads will wear out of time. This will happen faster if you are playing with a flatpick like you would on a tenor banjo or six string banjo. The constant hitting on the head with the pick can wear a hole into the head. Even if you don’t have a hole in the head, the head can lose its elasticity similar to the way an old rubber band does and the tone just won’t jump out of it as well. A new head can remedy this.
9. Sagging Bridge
If you notice your banjo bridge is sagging in the middle, get yourself a new banjo bridge. This sagging can make it hard to play as the strings will be dipping down as well.
CONCLUSION:
You don't have to be a luthier to do basic banjo setup and keep your banjo sounding and playing great. Usually it's just a few turns of a wrench and you're back in business. Try it out for yourself. As long as you make small adjustments, you really can't hurt anything and you can always move it back to the way it was.